I had posted, earlier, an island build for my daughter and family. I finally have gotten around to posting the final pictures. Thanks for looking.
A Gallery of My Finished Work
I had posted, earlier, an island build for my daughter and family. I finally have gotten around to posting the final pictures. Thanks for looking.
Pam’s Table
Pam wanted a farmhouse table and matching stool. Wood finished top and painted bases. And ‘chunky’ which means you could land a VW on it and it won’t collapse :). A lot more detail in the gallery…..
After some major remodeling in our home we started a furniture upgrade and a re-arrangement of our primary living space….our Family Room. With new sofas and recliners and such it came down to the smaller items…..specifically end tables. We needed two for our new space. So after various online and catalog searches my SO determined the ‘Crate and Barrel’ ENTU end table was the ticket. Me too, for that matter, until I saw the price tag.
Now, these tables are simple, contemporary design that employs very basic woodworking joinery methods. Easy to build, don’t need fancy wood, so let the fun begin!
Because of it’s color and grain patterns we chose Butternut (White Walnut) as the wood species of choice with no stain (let the wood stand for itself) and a top coat of oil based urethane so make sure the finish will resist water rings, coffee stains, etc.
Only took a few hours and most of the time was waiting for finish to dry. I admit, however, to some help. A young son (14) of a family friend, Aaron, has been spending some time with me in the shop and he actually did a lot of the work on this. Good job Aaron!
Now, these pictures are not great and distort the geometry of the piece a bit. Once I can get around to the second table I’ll do some beauty shots that Aaron and I can be proud of. Until then, well, just make the best
of it.
Salute!….
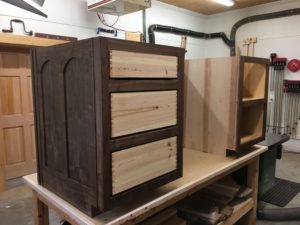
My daughter, Jill, and husband, Allen, are doing a ‘to the studs’ kitchen renovation and asked me to build them a ‘furniture grade’ kitchen island as part of their reno. . I was very honored and pleased that they asked not only because I like to do this type of work(my hobby) and they believe my quality of work to be good, but because I will be a contributor to and part of their home for many years to come, and that’s quite an honor.
Of course there were discussions and deliberations on size, location, features, accessories, and color. Drawings were done andeverything checked: rail and stile sizes, drawer slides and hinge types, even the topcoat (oil vs. waterborne urethane). But most importantly, the wood. This was the toughie….what species….and finally Jill nailed it with Walnut. After checking availability and prices at several suppliers I happened upon a Sawer near Laurens, SC that carried Walnut and, more specifically, had a barn-find, 20 yr old, air dried SC Walnut stack. I bought ~85 brd. ft. and we were on our way.
This posting is late in the game but the project isn’t finished yet. Thought I’d post a few pics just to get started. These are not ‘beauty shots’ and were taken in my shop with an iPhone under shop fluorescents but it’ll give you an idea of the final product. Once all is in and the reno is complete (maybe in a month) I’ll take a few beauty shots and post ’em.
Otherwise this project has been a great learning experience for me and fun to build witha fair share of challenges.
More, later. If you have a question please email me… otherwise, back to work!
Recently good friends decided they wanted to install a ‘booth’ in their kitchen and dispense with a ‘space eating’ kitchen table and chairs. I volunteered to help. This project gave me the opportunity to dress the booth seats up with raised panels and it also gave me the opportunity to work with re-claimed chestnut for their new table top. The end result is gorgeous!
Amazing how things work out sometime…..
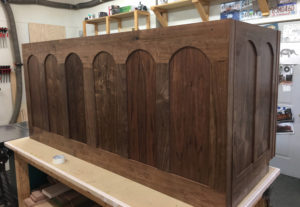
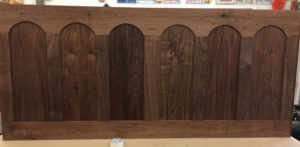
In March ’17 an Upstate SC Anglican church emailed me with a photo of an antique Gothic Pulpit.
“Can you build this?”, was the question.
“Maybe”, I responded, “Let’s talk.”
After a meeting with the church Rector and a little pre-design ciphering we agreed to proceed and, 4 months later, the pulpit was completed.
Without a doubt this is the most complicated piece I’ve ever done or will probably ever do. There are, seemingly, no plans or even dimensions for this type of pulpit on the internet, in books, or anywhere else I could find so it all had to be ‘created’.
It is made of Cherry because the original intention was a pulpit of ‘medium color’. However, after the pieces started coming together the Rector decided to go dark, so I finished it with a Red Mahogany stain and several top coats of General Finishes Oil/Urethane blend (hand applied). This thing would have been amazing in Mahogany or Sapele, but, what can you do….
Many, many lessons learned on this build….for example, how to dial in a perfect 22.5 degree cut; heavily pigmented stain application techniques; angled bandsaw cuts, just to name a few.
It now sits in the church, my shop looks barren and undergoing a major cleanup/re-org, and I’m beginning to look to the next build. Probably something simple.
What next?
Even though I built these tables a number of years ago I’ve finally gotten around to taking some pictures and posting them on my site. Nuttin’ fancy but lots of character. My family loves these tables….
In April I was contacted via CustomMade to see if I could build a very special piece. After some questions and rumination we decided to forge ahead. I’ve decided not to publish what this is all about simply because it is so unique….I’ve never known of another craftsman to build such a piece of furniture. Anyway, I’ve already started and am making good progress. Maybe I can publish the result is a month or so. Maybe.
Another ‘new’ addition to the website is another piece completed some time ago. This is a writing desk patterned after an advertisement I saw in a magazine while sitting in a dentist’s office. I loved the shape and size of the desk and even though I had no personal use for it I just had to build it. So I drew up some plans and went at it. It is now in the loving care of my son and his beautiful bride.
I’ve added a gallery of an entertainment center I did a number of years ago. It is essentially a milk painted with a light glazing two door cabinet with adjustable shelves. I built this for my daughter and her family as a Christmas gift and I’m proud to say that it’s still a part of their Family Room decor!